- Creating nodes
- Creating groups
- Creating components
- Disabling nodes
- Renaming nodes
- Adding comments
- Editing comments
- Replacing nodes
- Changing component properties
- Deleting a component
- Undoing and redoing actions
- Copying and pasting nodes
- Aligning and spacing nodes evenly
- Deleting nodes
- Automatic backup
- Cache settings
- Setting the theme
- Setting the environment level
- Configuring the global settings
Creating nodes
Select Edit > Create node and choose from the list of node categories a new to add node to the Graph.
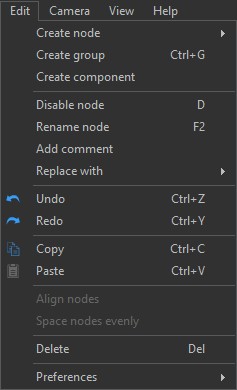
Right-click in the Graph and select this entry in the contextual menu. See also the Nodes reference guide for details on the node categories.
Creating groups
Click on the nodes you want to add to the group and select Edit > Create group
Press the keyboard shortcut Ctrl+G to create a group from the selected nodes. See Grouping nodes for more details.
Creating components
Select the nodes you want to add to the new component and select Edit > Create component.
See the documentation about components for more details.
Disabling nodes
Click on a node and select Edit > Disable node. When a node is disabled, it has no effect on the nodes to which it is connected.
Disable/enable a node by clicking its button or pressing the keyboard shortcut D. See Disabling nodes for more details.
Renaming nodes
Click on a node and select Edit > Rename node. Edit the node name in the pop-up dialog.
Press the keyboard shortcut F2 or right-click in the Graph and select this entry in the contextual menu. See Modifying a node name and adding comments for more details.
Adding comments
Click on a node and select Edit > Add comment. Add the comment in the pop-up dialog.
Right-click in the Graph and select this entry in the contextual menu. See Modifying a node name and adding comments for more details.
Editing comments
Click on a node and select Edit > Edit comment. Edit the comment in the pop-up dialog.
Right-click in the Graph and select this entry in the contextual menu. See Modifying a node name and adding comments for more details.
Replacing nodes
Click on a node and select Edit > Replace with and select either Compatible node or Any node.
Right-click in the Graph and select this entry in the contextual menu. See Replacing nodes for more details.
Changing component properties
Click on a component in the Models window and select Edit > Change component properties.
This entry is only available if a component or components are selected in the Models window. See Modifying a component name and adding comments for more details.
Deleting a component
Click on a componet in the Models window and select Edit > Delete component.
This entry is only available if a component or components are selected in the Models window. See Modifying a component name and adding comments for more details.
Undoing and redoing actions
Select Edit > Undo or Redo or press the keyboard shortcuts Ctrl+Z and Ctrl+Y, respectively, to undo or redo the last action.
If there is no action to undo, this entry is grayed out.
Copying and pasting nodes
Select Edit > Copy or Paste or press the keyboard shortcuts Ctrl+C and Ctrl+P, respectively, to copy the selected node(s) to the Clipboard or paste it at the mouse cursor position.
If no node is selected, this entry is grayed out.
Aligning and spacing nodes evenly
Select at least two nodes that are not already aligned. Select Edit > Align nodes.
Select at least three nodes that are not already spaced evenly and select Edit > Space nodes evenly.
Right-click in the Graph and select these entries
in the contextual menu. See Aligning nodes for more
details.
If the nodes are already evenly spaced, the entries does not appear
in the contextual menu.
Deleting nodes
Select Edit > Delete or press the keyboard shortcut Del to delete the selected node(s).
If no node is selected, this entry is grayed out.
Automatic backup
Select Edit > Preferences > Backup settings... to open the automatic backup settings dialog. See Automatic backup for details.
Cache settings
Select Edit > Preferences > Cache settings to open the cache settings dialog. See Cache settings for details.
Setting the theme
Select Edit > Preferences > Theme and choose a color to set the theme of the application:
- Blue
- Gray
- Light
Setting the environment
Select Edit > Preferences > Environment settings... to open the Environment settings dialog where you can set:
- Light presets: Defaut, Morning, Midday, Afternoon, High contrast
- The direction of the sun's rays
- The sun's color and intensity
- The sun's ambient color and its intensity
- The Sky color
- Show water to toggle the display of water
- The water altitude, color, and opacity
- The terrain sides gradient color
- The Shadow quality (if the Use shadow box is checked) and opacity
See Setting the environment for more details.
Configuring the global settings
The global settings allow you to define how the selection rectangle works and where to store the global components.
Select Edit > Preferences > Global settings...
See Configuring the global settings for more details.